How to Prevent Your Emails from Going to Spam — A Complete Guide
If your emails land in the SPAM folder — even when you’re not sending promotional content — it means you’re doing several things wrong. Follow these 6 steps to fix your deliverability and reach more customers.
Companies that primarily rely on face-to-face (F2F) sales often struggle when they try to add digital marketing channels. Both infrastructure gaps and technical knowledge gaps lead to serious problems.
In this article, I’ll cover everything from personalizing your emails to segmenting your lists — explaining what you need to do to keep your emails out of spam and why they’re ending up there in the first place.
Why Are My Emails Going to Spam?
To stop your emails from being flagged as spam, you first need to identify what you’re doing wrong. If you don’t want your emails marked as spam, you need to eliminate all of the issues below.
1. Problem: Blacklists
The first and most critical issue: your domain might be blacklisted. A blacklist is a real-time list of domains that have been flagged or reported as spam. Email providers (Gmail, Yahoo, etc.) use these lists to protect their users from unwanted emails.
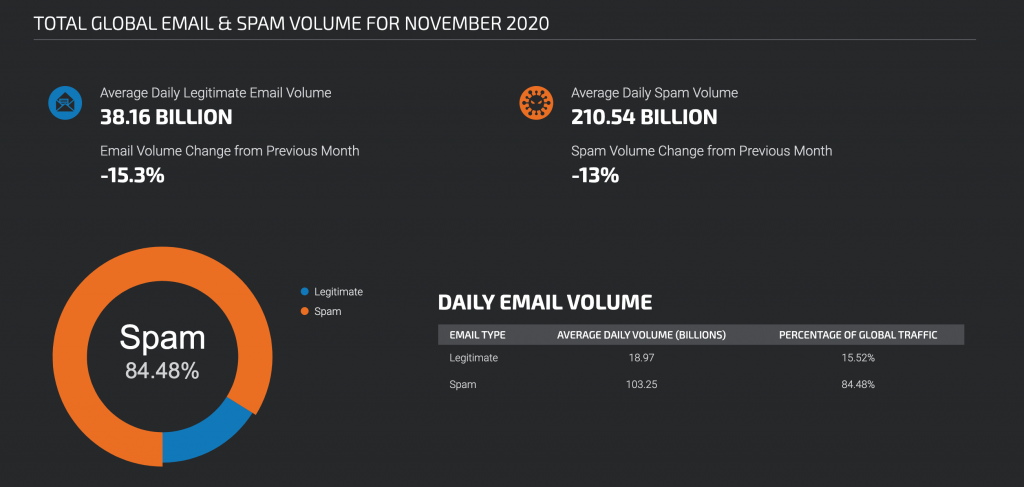
Considering that 84% of all emails sent worldwide are classified as spam, these blacklists are actually essential for protecting us from unwanted messages.
Solution
First, use MXtoolbox to check if your domain is blacklisted. If it is, getting delisted varies by blacklist provider — most have a removal request process on their website. To avoid getting blacklisted in the first place, follow all the solutions in this article and don’t send grey-area emails.
Practical tip: After setting everything up, send a test email to mail-tester.com. It gives you a score out of 10 — checking SPF, DKIM, DMARC, content analysis, and blacklist status all at once. Aim for 9/10 or higher.
2. Problem: Domain Reputation
IP Reputation and Domain Reputation are different concepts that heavily influence each other. While you might be able to fix IP reputation issues, if your domain reputation is damaged, recovery is much harder.
Domain Reputation is the single most important factor in determining whether your email reaches the recipient’s inbox. In short, email services judge your messages by your domain’s reputation.
For example, if you send emails from your custom domain to 10 Gmail users and 9 of them mark you as spam, it would be optimistic to expect your future emails to avoid the spam folder.
Solution: How to Improve Domain Reputation
When you implement all the tips in this article, your domain reputation will naturally improve.
For instance, if your email content is good and you’re sending it to the right person, they won’t mark it as spam — they’ll flag it as important and reply. This significantly boosts your reputation with email services.
Note: Use Google Postmaster Tools to monitor your domain reputation from Google’s perspective.
Email Warmup
If you’re planning to email a large list (say 100 people — and if you’re reading this as a beginner, I’d recommend no more than 100 per day), start small. Begin by emailing 5 people and maintain conversations based on their replies.
Getting replies in small batches and continuing email threads prevents future emails from being flagged and increases your Domain Reputation Score.
Some email marketing tools offer automated warmup features where the tool sends emails on your behalf that get replied to and marked as important. For manual warmup, the key is consistency and gradual scaling.
3. Problem: Sending Frequency
I’m still surprised to see people using Outlook to blast hundreds of emails at once. Please send no more than 100 emails per day, and spread the sending throughout the day.
Solution: Use Email Tools
Email marketing tools let you schedule and spread your bulk emails throughout the day, avoiding the mistake of sending everything at once.
There are many email marketing tools available at various price points. Do some research to find the one that fits your needs. For personalized bulk sending, check out my Lemlist bulk email guide.
4. Problem: Email Content and Spam Trigger Words
Spam filters analyze your email content. If your emails contain spam trigger words and phrases, stop using them or rephrase.
Examples of spam triggers include: “Congratulations”, “100% Free”, “Click now”, “Special offer just for you”, “Don’t miss out”, “Free”, “You’ve won” — essentially, any phrase commonly found in unwanted emails.
Also, don’t make your entire email out of images. Email services trust text-based emails more.
5. Problem: Invalid and Poorly Targeted Email Addresses
I cover the email finding process in detail in a separate guide. Use tools like Snov.io Email Verifier to validate your existing list. If you’re building a new list, never add an address without verifying it first.
The other essential move is segmenting your email lists. This can be challenging, but by sending different content to different audience segments, you dramatically increase engagement. Higher engagement sends positive signals to email providers, reducing spam flags over time.
Every email we send carries responsibility. That’s why verifying that the people on our list are real and properly targeted is crucial.
6. Problem: SPF, DKIM, and DMARC Records
SPF, DKIM, and DMARC are technical settings that verify your emails genuinely come from you. Without them, email services won’t trust your messages, dramatically increasing the chance of landing in spam.
SPF (Sender Policy Framework)
SPF is a DNS record that specifies which servers are authorized to send email on behalf of your domain. Add a TXT record like this to your DNS management panel:
Type: TXT
Host: @
Value: v=spf1 include:_spf.google.com ~all
The example above is for Google Workspace. The include part changes based on your service (Microsoft 365: include:spf.protection.outlook.com, Zoho: include:zoho.com). If you use multiple services, combine them in a single SPF record. Important: Keep to one SPF record and stay under the 10 DNS lookup limit.
DKIM (DomainKeys Identified Mail)
DKIM adds a digital signature to every email you send. The recipient’s server verifies this signature against the public key in your domain’s DNS, confirming the email came from you and wasn’t tampered with in transit.
DMARC (Domain-based Message Authentication, Reporting & Conformance)
DMARC builds on top of SPF and DKIM as a policy layer. It defines what happens to emails that fail authentication (accept, quarantine, or reject) and sends you reports.
I recommend tightening DMARC gradually: start with p=none for 2-4 weeks to monitor (you’ll see who’s sending email on behalf of your domain), then move to p=quarantine, and finally p=reject. This way you won’t accidentally block legitimate emails.
Setting up all three records correctly dramatically improves your inbox delivery rates. You can add these records in your DNS management panel — your email provider’s documentation (Google Workspace, Zoho, Yandex, etc.) has step-by-step instructions.
Important update: Starting in 2024, Google and Yahoo require all senders sending more than 5,000 emails daily to have SPF or DKIM, DMARC records, and a one-click unsubscribe (List-Unsubscribe header). Senders who don’t meet these requirements can’t reach Gmail and Yahoo users.
When you implement all 6 steps with your own adaptations, your domain reputation will naturally improve and the likelihood of your emails hitting spam will decrease significantly.
To find the right people’s email addresses, check my email finding guide. For bulk email tools, see my Lemlist bulk email guide.
Related Posts
If you found this useful, check out my other articles.
All Posts →